


Key takeaways
Having a vision of your project is one thing, but sitting down to write the plan is where it gets intimidating, especially when you’re expected to estimate the people, resources, and timeline you’ll need. The hardest part isn’t the writing itself; it’s knowing what to estimate when you don’t have all the answers yet. In this article, I’m sharing the top strategies I’ve refined over my years of creating project management plans and how to put together one that gets that winning approval.
What is a project management plan?
The Project Management Body of Knowledge (PMBOK) defines a project management plan as a document that describes how the project will be executed, monitored and controlled, and closed.”Think of it as the contract between you, your team, and your stakeholders on how the work will run from start to finish. Without a project management plan, teams often work from different assumptions, which creates confusion around priorities, ownership, and project progress.
Key components of a project plan
Plan ahead for project success by considering the following key components of a project plan before creating one.
- Project objectives: Clearly define the desired outcomes, deliverables, and purpose.
- Project scope: Determine what is included and excluded.
- Resource allocation: Identify required people, budget, and tools.
- Timeline and milestones: Set deadlines and key deliverable dates.
- Project budget: Define or access the budget for the project.
- Risk assessment: Anticipate risks and develop mitigation strategies.
- Communication plan: Create a plan for formal and effective communication with all parties throughout the life of the project.
- Tools and documentation: Identify which tools to use for documenting, tracking, and completing work and provide everyone access following kickoff.
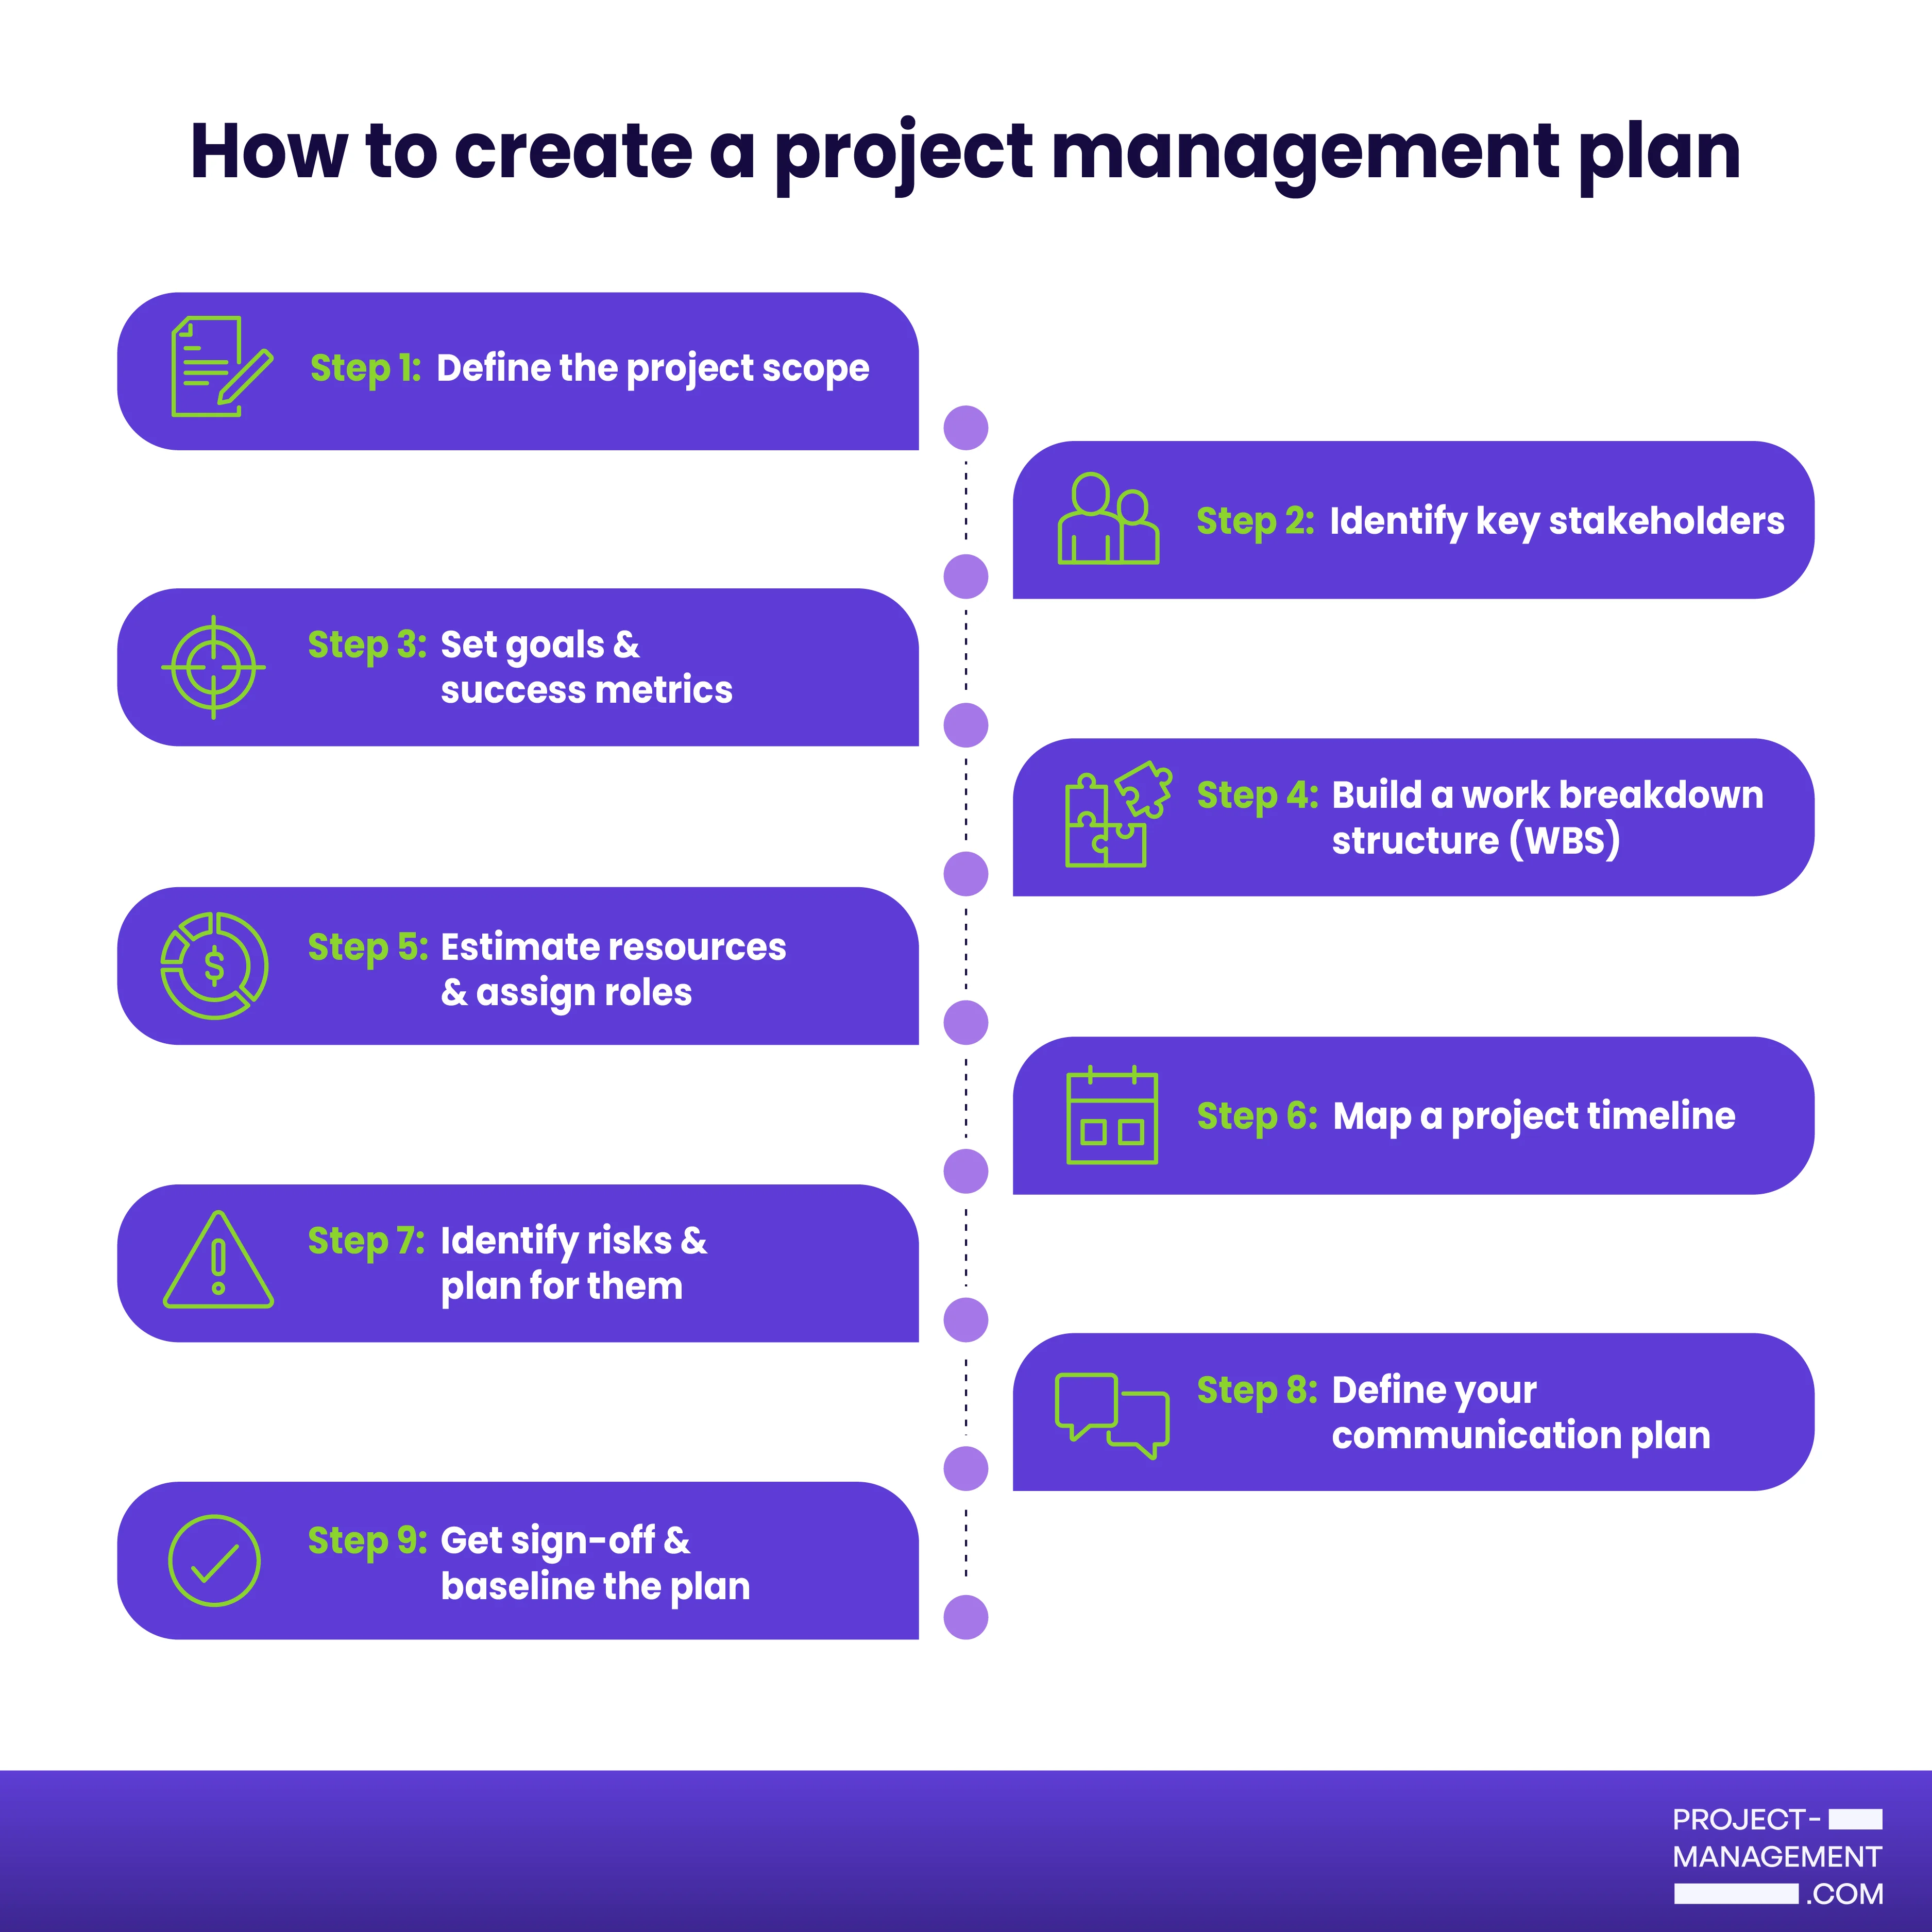
Steps to creating a project management plan
To create a project management plan, you need to work through nine steps:
Step 1: Define the project scope
The scope document is the first thing you write and the one you’ll reference the most. It states what the project will deliver, what it won’t cover, and what conditions the project must operate within. Be specific, because that level of detail is what protects you when stakeholders request additions mid-project.
Example: Instead of writing “Redesign the checkout flow,” write “Redesign the checkout flow for mobile users on iOS and Android, excluding guest checkout functionality.” The second version gives you something to point to when a stakeholder asks why guest checkout wasn’t included.
Step 2: Identify key stakeholders
Make a list of everyone who has influence over the project or will be affected by its outcome. This includes your sponsor, the client, your core team, and any external teams whose work connects to yours. You can use a RACI matrix to note their role: who approves decisions, who needs to be consulted, and who just needs to be kept informed.
Example: On a product launch project, your sponsor approves budget changes, your legal team needs to review marketing copy before it goes live, and your customer support team needs to know the launch date so they can prepare. Each group gets a different level of involvement.
Step 3: Set goals & success metrics
Write down what the project needs to achieve in terms that can be measured. Tie each goal to a business outcome so stakeholders understand why it matters. This also gives you a concrete basis when priorities shift and someone wants to cut scope.
Example: Instead of “improve site performance,” write “reduce page load time from 4.2 seconds to under 2 seconds by Q3, which is projected to reduce cart abandonment by 15%.” Now the goal has a number, a deadline, and a business reason behind it.
Step 4: Build a work breakdown structure (WBS)
A WBS breaks the project into phases, then breaks each phase into individual tasks with defined outputs. The goal is to reach a level of detail where each task has an owner and a time estimate. If a task still feels too broad to estimate, break it down further.
Example: “Develop backend API” is too broad. Break it into “Build user authentication endpoint,” “Build order submission endpoint,” and “Build payment processing endpoint.” Each one can now be assigned, estimated, and tracked independently.
Step 5: Estimate resources & assign roles
For each task in your WBS, identify who will do the work, what tools or budget they need, and how much time it will take. Check team availability rather than assuming full capacity. Assign one owner to every task, because shared ownership creates confusion about who is responsible when delivery falls behind.
Example: If your developer is split across two projects and only has 50% availability, a task estimated at 10 hours will take two weeks, not one. Build that into the timeline upfront rather than discovering it when the deadline passes.
Step 6: Map a project timeline
Take your task list, map dependencies, and sequence the work in order. Tasks that depend on other tasks cannot start until upstream tasks are complete. Set milestones at points where a major deliverable is complete or a key decision needs to be made.
Example: If the design phase must be approved before development starts, those two phases cannot run in parallel. Mark design approval as a milestone so you have a fixed checkpoint to track. If design gets delayed by a week, you know immediately that development will too.
Step 7: Identify risks & plan for them
A risk is anything that could delay the project or reduce the quality of a deliverable. For each risk, rate it by likelihood and impact, then write a mitigation plan. Review the log regularly so it stays relevant throughout the project.
Example: If your project depends on a third-party vendor delivering an integration by week four, that dependency is a risk. Your mitigation plan might be to confirm the vendor’s timeline in week two and identify an alternative vendor in case they fail to deliver.
Step 8: Define your communication plan
Decide how often you will update stakeholders, what information each update will include, and which channel you will use. The format matters less than the consistency. Stakeholders who receive regular updates ask fewer unscheduled questions and are less likely to escalate concerns.
Example: For a three-month project, a weekly status email covering what was completed, what is in progress, and any blockers is usually enough. For a fast-moving two-week sprint, a daily standup keeps everyone informed without requiring a written report.
Step 9: Get sign-off & baseline the plan
Before execution begins, walk key stakeholders through the plan and get formal written approval. Once approved, the plan becomes your baseline. Any changes to scope, budget, or timeline after this point go through a formal change request, not an informal conversation.
Example: A stakeholder asks mid-project to add a new feature. Without a baseline, that conversation is informal and easy to agree to in the moment. With a baseline, you can show exactly how the addition affects the timeline and budget, and let the stakeholder decide whether it is worth the trade-off.
Free project plan templates
Check out these templates and select the one that best satisfies your project needs.
1. Grid-style project plan

This project plan template from monday work management is designed for single-project teams that need a centralized workspace to manage tasks, timelines, dependencies, ownership, and project costs. The layout separates work by project stage, highlights task status with color coding, and combines scheduling, dependencies, and budget details in one table so project managers can review the project plan quickly during status meetings. This template fits traditional or hybrid workflows best because it emphasizes phased delivery and task sequencing.
Visit monday.com2. PMO-style project plan template
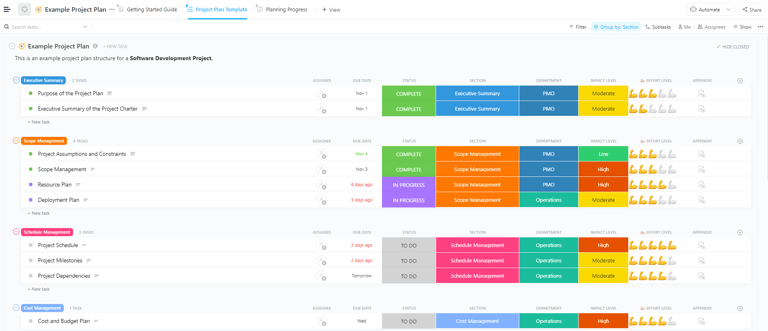
This sample project management plan from ClickUp works for software development or cross-functional business projects that require comprehensive planning across scope, scheduling, budgeting, and departmental coordination. Color-coded statuses, due dates, departments, and effort indicators make it easier to track progress and identify work requiring extra attention. The template also group related tasks under dedicated management areas such as scope, schedule, and cost management.
Visit ClickUp3. Integrated project plan template

This Smartsheet template combines a task list with a Gantt chart to demonstrate how daily tasks connect to the project timeline. It displays task durations, deadlines, and milestone progress in one view, which makes schedule tracking easier across project phases. The template follows a sequential task structure tied to fixed deadlines, making it a better fit for Waterfall projects than iterative or flexible methodologies.
Visit SmartsheetBest practices for mastering a project plan
1. Define clear goals for the project
Start by identifying its objectives and desired outcomes, and clearly articulate what success looks like. Assess if the project has been done before and determine what needs to be achieved. Establish how success will be measured and confirm buy-in from key leaders and the organization. Evaluate the project’s priority, including whether there is an MVP or multiple phases. Identify necessary resources, both internal and external, and establish a timeline for completion.
2. Map out the scope of the work
To map out the scope of work for a project, first understand the overall scope, including deliverables, constraints, and boundaries. Clearly define what is in and out of scope. Determine the budget, noting if it is fixed or phased. Identify specific deliverables and confirm if there is a fixed deadline and the factors driving it.
3. Develop an outline and build the plan
Create a structured plan that details tasks, milestones, and dependencies. Break down the work into manageable components, identifying key milestones and workstreams. Note dependencies between tasks, make educated estimates for new work, and add buffers. Draft the plan, review, and finalize it for execution.
4. Share with stakeholders and the project team
Share the project plan with stakeholders and the project team, present your initial plan, and seek their input to ensure alignment and buy-in. Clearly explain the project’s details, including objectives, scope, and milestones. Ensure the appropriate leads are assigned to each workstream, even if they need to delegate tasks. Highlight potential risks and obtain approval from the team on both the draft and final plans.
5. Consider risks
An unavoidable reality to address is project risk. Expertly navigate project risks by conducting a thorough risk assessment and planning for potential challenges. Address risky tasks early on to mitigate impact. Watch for scope creep, manage time constraints, control costs, and prevent miscommunication within the team to ensure project success.
6. Stay agile
To remain agile as you work through the project management plan, balance the triangle of scope, resources, and schedule while prioritizing quality and adaptability. Regularly review and adjust processes to meet evolving needs and stay open to change. Embrace evolving requirements and incorporate agile practices into your plan, even if this is only one team’s methodology. Stay flexible and responsive to the sprint-based work environment, even if you choose to just use a hybrid approach to the overall project.
FAQs
What should a project management plan include?
A project management plan should include the project scope, goals, success metrics, timeline, resource assignments, risk log, and communication plan. Each component tells your team what needs to be done, who is responsible, and how progress will be measured before any work starts.
Who is responsible for creating a project management plan?
The project manager owns the project management plan, but creating it is a team effort. Input from stakeholders, team leads, and subject matter experts is what makes the plan accurate. A plan built in isolation tends to miss critical dependencies and resource constraints.
How often should you update a project management plan?
Review your project management plan at least once a week as the project progresses. Update it whenever scope changes, deadlines shift, or new risks emerge. A plan that does not reflect current project conditions stops being useful as a decision-making tool.